Tuesday, August 21, 2012

Chocolate Cupcakes with Cream Cheese Frosting

I took German in middle and high school, partially because I thought it would help me on the SATs (nerd!) and partially because my older brother also took it and I thought we'd be able to speak to each other without Mom and Dad understand. Over the years, I've gradually forgotten almost everything I learned during those six years, but a few things stayed with me, including one of my favorite German sayings: "wenn die Katze fort is, tanzen die Maeuse," or "when the cat is away, the mice will play!"

My parents were away this past weekend, which meant that I was free to stay up late, sleep in late, loaf around the house, and eat lots of junk food. Lucky for me, my friend hosted a BBQ at her house on Saturday, which meant that I did actually consume a modicum of vegetables... along with enough ribs and chicken to induce a mild meatache. Yes, you read that right -- I said meatache.

Of course, I couldn't arrive at a BBQ empty handed, so I whipped up a batch of these chocolate cupcakes with cream cheese frosting that I bookmarked from Mel's Kitchen Cafe a few months back. Mel describes them as the "Perfect Chocolate Cupcakes," which seemed too good to pass up. I also scrounged up these bright green foil cupcake liners, which I absolutely adore. 
Lessons learned? Several. If I make these again in the heat of summer, I'll try to chill the frosting; you can tell from the picture that it melted a bit and ended up resembling a snowdrift much more than frosting. Live and learn. Also, my friends told me the cupcakes were good, but then, that is the trouble with having really wonderful friends. They'll always say the cupcakes are good, even if they're awful. I have a feeling I overbaked these just a tad, but they were too polite to say anything.

Here is the recipe, which I had to adapt ever so slightly. I didn't have heavy cream for the frosting, so I subbed almond milk -- that may have contributed to the generally droopy look of the frosting. Also, I baked the cupcakes for the recommended 18 minutes, but they didn't seem to be fully done, so I left them in a little bit longer. Too long? Perhaps. But there is always next time.

Perfect Chocolate Cupcakes from Mel's Kitchen Cafe
Makes 24 cupcakes
INGREDIENTS:
1/2 cup plus 1 tablespoon cocoa powder, Dutch-process or regular unsweetened
1/2 cup plus 1 tablespoon hot water
2 1/4 cups all-purpose flour
3/4 teaspoon baking soda
3/4 teaspoon baking powder
1/2 teaspoon salt
2 sticks plus 1 tablespoon (17 tablespoons total) butter, at room temperature
1 2/3 cups granulated sugar
3 large eggs, at room temperature
1 tablespoon vanilla extract
3/4 cup sour cream

DIRECTIONS:
Preheat the oven to 350 degrees F. Line 2 standard cupcake pans with paper liners. In a glass liquid measuring cup, combine the cocoa powder and hot water and whisk until smooth. In a medium bowl whisk together the flour, baking soda, baking powder, and salt.

In a medium saucepan over medium heat, combine the butter and sugar. Cook, stirring occasionally, until the mixture is smooth and the butter is completely melted. Transfer the mixture to the bowl of an electric mixer (or to a stand-alone bowl, using a handheld electric mixer) and beat on medium-low speed until the mixture is cool, about 4-5 minutes. Add the eggs one at a time, mixing well after each addition and scraping down the sides of the bowl as needed. Blend in the vanilla and then the cocoa mixture until smooth. With the mixer on low speed, add the flour mixture in three additions alternating with the sour cream, beginning and ending with the dry ingredients and mixing each addition just until incorporated. So basically you’ll add 1/3 of the flour, mix, then add 1/2 of the sour cream, mix, add another 1/3 of the flour, mix, add the rest of the sour cream, and finish with the last 1/3 of the dry ingredients.

Divide the batter evenly between the prepared liners, filling no more than 2/3 full. If you live at a high altitude or have had overflowing cupcakes in the past, err on the side of filling the liner of one cupcake 1/2 full and baking it alone first to judge how the cupcake will rise in the oven. Bake the cupcakes until a toothpick inserted in the center comes out clean, about 15-18 minutes. Remove the cupcakes to a wire rack to cool completely.

And here is the frosting recipe, also from Mel's Kitchen Cafe: Quick Vanilla Buttercream Frosting.


Saturday, August 11, 2012

(Save the Polar) Bear Claws... 5 years in the making

On November 2, 2011, I received the following email from my dad:

found this as i was cleaning up old boxes of stuff....must have kept it thinking 'how interesting'....note date...eve of your graduation!!

The attached file contained a New York Times magazine clipping from May 20, 2007, entitled Flour Power: Even a bakery -- especially a bakery -- can lower the wattage, about a New York City bakery called Birdbath that billed itself as a "green bakery." The primary point of interest, at least for Dad, seemed to be a recipe for (Save the Polar) Bear Claws.

It warms my heart a bit to think that even then, my dad felt like baking could be "a thing" for me. As far as I can remember, I didn't really get into baking until sometime in college, and I didn't actually get to practice much while I was in school because I didn't have a proper kitchen. Despite all of that, Dad seemed to know that someday I might appreciate this clipping, and he managed to save it all this time. Parents know best, I guess... Or maybe it is partially attributable to my family's mild "hoarder" tendencies.

Anyway, fast forward 5 years from when Dad first snipped the article, and my parents have befriended the nicest, coolest stone fruit farmer at our farmer's market, and have taken to making preserves from his glorious bounty. Re-enter ye ole' bear claws recipe, which calls for both dried and preserved apricots.
I finished baking these tonight, and while they're certainly delicious, the truth (as Mom pointed out) is that these aren't really bear claws -- at least not in the traditional sense. As you can see from the picture, they're much more like my old standby pop tarts, but with notches cut on one end to resemble bear toes. I actually prefer the pop tart pastry recipe, because I think the addition of egg yolks makes for a more delicious crust, but these bear claws do use mascarpone cheese, which is an interesting twist. Would I make these again? I'm not sure. Am I glad I tried them once? Absolutely. Aren't they cute? Plus, let's be honest -- it is extremely difficult to go wrong with pastry and fruit. 

Here's a link to the original article from the NYT. Recipe follows.

(Save the Polar) Bear ClawsUse organic ingredients where possible.
For the dough:

4 cups plus 2 tablespoons flour

1 teaspoon salt

1 pound (4 sticks) butter, softened

1 pound (2 cups) mascarpone

For the filling and topping:

2 cups unsulfured dried apricots

1/3 cup apricot preserves

1 large egg yolk

2 tablespoons heavy cream

3 ½ tablespoons turbinado sugar.

1. Place the flour and salt in the bowl of an electric mixer fitted with a paddle attachment. With the mixer on low, add the butter, 2 tablespoons at a time, until incorporated. Then add the mascarpone, 2 tablespoons at a time, until blended.

2. Divide the dough into 3 equal balls. Flatten each ball into a disc, wrap in plastic and refrigerate for 2 hours or overnight.

3. Prepare the filling by bringing the apricots and 2 ½ cups water to a boil. Boil for 2 minutes. Let cool completely, then drain apricots and roughly chop.

4. Dust a work surface lightly with flour. Roll one disc of chilled dough into an 9-by-13-inch rectangle, ¼ -inch thick. Then cut the rectangle into 3 (9-by-4 1/3-inch) smaller rectangles. Lay each rectangle vertically. Place 2 ½ to 3 tablespoons apricots on the bottom half of the rectangle. Top with 1 ½ teaspoons of apricot preserves. Fold the top half of the dough over the fruit and press down along the edges to seal. Using a paring knife, cut away a small amount of the sealed edge to tighten the seal. Cut 4 ( 3/4-inch-long) slits into the sealed end (opposite the fold) to make bear nails. Repeat with the remaining discs of dough. Refrigerate the bear claws for 30 minutes.

5. Preheat the oven to 375 degrees. Line 2 baking sheets with parchment paper. In a small bowl, whisk together the egg yolk, cream and a few drops of water. Place bear claws on the baking sheets 2 inches apart. Brush the top of each bear claw with the egg wash, then sprinkle with sugar.

6. Bake until golden brown, about 30 to 35 minutes. Remove bear claws from the oven and let cool. Makes about 9 bear claws. Adapted from Maury Rubin, the owner of Birdbath bakeries.


Wednesday, July 11, 2012

Summer Stone-Fruit Pop Tarts

I really thought that when I came home for the summer I would have lots of time to bake and try new recipes, but I forgot how tiring full-time work can be. I'm really enjoying my summer internship, but I'm less enthusiastic about waking up at the crack of dawn to catch a 7:30am train to San Francisco. Sometimes I think about how I used to wake up every day at 6:30 when I was in high school, and I wonder how I survived...

Anyway, the point of all this is to explain why I haven't posted in almost a full month. In truth, I have baked a couple of times, but I just haven't had time to take pictures and blog about it. 

The one project I did remember to photograph were these stone fruit pop tarts.


My parents befriended one of the stone fruit famers at our local farmer's market, so every Sunday they come home with mountains of peaches, plums, nectarines, and apricots, as well as some of the newfangled blends like apriums and pluots. I love them all, but I think the white nectarines are my favorite.

A few weeks ago, Mom and Dad asked me to make a dessert for them to bring to a potluck dinner with their friends, so when I got home on Friday evening, I whipped up a double batch of my favorite pâte brisée, and on Saturday morning, I woke up early to roll out the dough, assemble the tarts, and bake them up. Honestly, if that is not the epitome of daughterly love, I don't know if I'm up for this job.

I decided to go ahead and fill these with just fresh fruit -- no sugar, no butter. The apricots and peaches were definitely sweet enough, but the plums could have used a touch of honey. Live and learn!

I won't bore you with the recipe for something that I've blogged about numerous times, but I will share some more pictures, including one that shows exactly why I love this recipe (read: delicious flakes of butter), and one of the pop tart dumpling that I made with my little bit of extra dough (so cute!).


Monday, June 18, 2012

Gluten-free Chocolate Chip Cookies

I'm back in the Bay Area now, but I right before I left LA I attempted a sort of kitchen purging process whereby I tried in vain to use up all of the perishables in my fridge and cupboards. I didn't get anywhere close to finishing everything, but I did manage to eek out one last batch of cookies using this almond meal that has been in my fridge for a while (Egads! Does almond meal go bad? Hmm...).
As the three people who read this blog know (Hi, Elaine!), I always have chocolate on hand, so chocolate chip cookies seemed like a plausible choice. I occasionally worry that "gluten-free" versions of beloved desserts will disappoint and seem too "healthy," but these actually came out pretty tasty. They didn't have the same "crispy on the edge, chewy in the center" texture that I crave in traditional CCCs, but they were moist, chewy, and not too sweet... And since we're being honest (as we always are on this blog), I'll reveal that I had four in one night while studying for my corporate finance final. I haven't received my grade in that class yet, so it is still TBD whether there is a positive correlation between cookies consumed and exam performance. Stay tuned for updates on the findings of my research in this area.
I used this recipe from a blog with an intriguing title, thewannabechef.net. I don't have any insightful observations about this blog beyond what I just said, so I will simply leave you with the recipe, which I now consider a completely wonderful way to use up leftover almond flour.


Almond Flour Chocolate Chip Cookies, slightly adapted from thewannabechef.net

(Makes about 12 cookies)
  • 1 1/2 cups (6 ounces) almond flour
  • 1/4 cup butter, room temperature
  • 1/4 cup sugar
  • 1 egg
  • 1/4 teaspoon salt
  • 1/2 teaspoon vanilla extract
  • 1/4 teaspoon baking soda
  • 1/4 cup chocolate, chopped into chunks (I used parts of two bars I had lying around, including one that had hazelnuts and dried currants. #swoon.)


Preheat your oven to 375.

Chop chocolate bar into chip-sized chunks. Cream the butter and sugar together until smooth. Mix in the egg. Next, add the almond flour, vanilla, salt, and baking soda and mix until it’s all incorporated. Fold in the chocolate chips.


Line a baking tray with parchment paper. Scoop the batter into even portions onto the parchment paper and press down slightly. Bake for 12-15 minutes until golden brown. Let cool slightly before removing the cookies from the tray.

Wednesday, May 30, 2012

Experimenting with Snickerdoodles

I'm flying out tomorrow night on a red-eye to attend my five-year college reunion. Shocking, but true. Five years!

Anyway, I managed to finish all my homework and reading early (or at least all the reading I could motivate myself to read...), so after packing, cleaning, watching How to Steal a Million on Netflix, and running some errands, I decided to bake some cookies. There's no way I can eat two dozen cookies in 24 hours, so in retrospect, this wasn't the best idea... I guess I'll have to share with some of my pals at school!

I didn't feel like running out to the store (obviously), but I keep staples on hand for just this kind of cookie crisis. Enter the snickerdoodle!
I'm calling these "experimental" for two reasons... 

Diversion #1: For some reason, I thought snickerdoodles didn't have any special ingredients... Turns out that all the best-rated recipes call for cream of tartar, though. I, of course, do not stock cream of tartar. However, I read online that you can replace the combination of cream of tartar and baking soda with baking powder. Hurray for improvising!

Diversion #2: I try to use a scale whenever I bake, because I've read that baking by weight is more accurate. Unfortunately, my baking scale chose tonight to start going on the fritz, and it kept zero-ing out as I was measuring the flour. As a result, I'm pretty sure I over floured by about 1/2 a cup; the only thing I could think to do was to add an extra egg white I had in my fridge. More improv!

Thankfully, neither of these changes seemed to impact the end result. I guess these came out a little bit more "fluffy" than the traditional snickerdoodle, but how can you go wrong with sugar, butter, flour, and cinnamon?

Here is the recipe I tried to follow -- emphasis on the "tried"...

Snickerdoodles from Smitten Kitchen (I made a half-recipe, since I honestly would not know what to do with three to four dozen cookies)

2 3/4 cups all-purpose flour
2 teaspoons cream of tartar*
1 teaspoon baking soda*
1/4 teaspoon salt
16 tablespoons (2 stick or 8 ounces) unsalted butter, at room temperature
1 3/4 cups sugar, plus more if needed
2 tablespoons ground cinnamon, plus more if needed
2 large eggs

Preheat the oven to 400°, with one rack in top third and one rack in bottom third of oven. Line baking sheets with silicone baking mats or parchment paper; set aside.

Sift together flour, cream of tartar, baking soda, and salt; set aside. In the bowl of an electric mixer fitted with a paddle attachment, combine butter and 1 1/2 cups sugar. Beat on medium speed until light and fluffy, about 2 minutes. Scrape down sides of bowl. Add eggs, and beat to combine. Add dry ingredients, and beat to combine. Chill the dough for an hour.

Once dough has chilled, in a small bowl, combine remaining 1/4 cup sugar and the ground cinnamon. Use a small ice-cream scoop* to form balls of the dough, and roll in cinnamon sugar. Place about two inches apart on the prepared baking sheets. Bake until the cookies are set in center and begin to crack (they will not brown), about 10 minutes, rotating the baking sheets after five minutes. Transfer the sheets to a wire rack to cool about five minutes before transferring the cookies to the rack.

* I substituted 1 tablespoon of baking powder for the baking soda and cream of tartar

Monday, May 21, 2012

Homemade Oreos... TKO-style

Mom rarely let J and me eat processed sweets as kids. She claims this is because she has a guilty conscience about working for a marketing firm that promoted sugary cereals that rot children's teeth, but I suspect it had more to do with not wanting to deal with rugrats on sugar-highs. However, yesterday it occurred to me that despite herself, my mom did allow one particularly delightful treat into our home: Oreos. There is only one explanation for this... Nabisco must be right when they claim that Oreos are America's favorite cookies. Even Mom couldn't resist.

Understandably, then, when I came across this recipe for Thomas Keller's TKOs (yes, this links to a recipe for the Oreo-style cookies he sells at the famed Bouchon Bakery), my heart nearly skipped a beat. My beloved childhood treat transformed by one of the world's master chefs? Done and done.
These were delicious. Obviously. Rich, buttery chocolate cookies filled with creamy white chocolate flavored cream? I don't even know where to begin (or end... I've had three just today), so here's the recipe. Bake and enjoy.

TKOs (from Gilt Taste)
Adapted from Thomas Keller and Lena Kwak

Makes about 3 dozen cookies

For the cookies:
1½ cups all-purpose plus 3 tablespoons flour
¾ cup sugar
¾ cup cocoa powder (not Dutch-processed)
1½ teaspoons kosher salt
½ teaspoon baking soda
15 tablespoons unsalted butter, at room temperature

For the filling:
½ cup heavy cream
8 ounces white chocolate chips

1. Make the cookies: Preheat oven to 350°F with racks in upper and lower thirds.

2. Combine flour, sugar, cocoa, salt and soda in a mixing bowl, then mix with a mixer on low speed. Add butter a few tablespoonfuls at a time and continue to mix, increasing speed until a dough forms. (It will look dry and sandy at first.)

3. Divide dough in 2 halves. Roll each half between 2 sheets of parchment paper to 1/8-inch thick, then chill on a baking sheet in the refrigerator, 25 minutes. Cut rounds from dough using a 2” to 2½” cutter, then transfer rounds to buttered baking sheets. Bake cookies, rotating sheets half way through, until centers are dry to the touch, 12 to 15 minutes. Cool cookies on sheets, 10 minutes, then transfer to cooling racks to cool completely.

4. Make the filling: Bring cream to a boil in a small sauce pan. Place chocolate in a heat-proof bowl, then pour boiling cream over chocolate, whisking to combine. Let cool to room temperature.

5. Assemble cookies: Spread 1 cookie with some of filling, then sandwich with another cookie. Serve with milk.

Wednesday, April 18, 2012

Yogurt and Blueberry Scones

I don't know if I have revealed this on my blog yet, but my all-time favorite fruit is the blueberry. I could eat them all day every day and never get sick of those delicious little morsels.

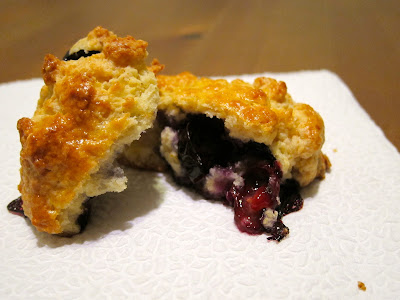
Perhaps it is odd, then, that I'm not a huge fan of baked goods with blueberries in them. Yes, given the choice between a muffin containing blueberries or any other fruit, I will likely choose the blueberry option, but I still much prefer the fruit so fresh and so clean. I will admit that blueberry baked goods LOOK amazing, though.

That's probably why I was so interested in trying these yogurt and blueberry scones from the King Arthur Flour blog. I had to make a couple tweaks, because I'm out of almond extract and  only had plain yogurt, but other than that, I followed the recipe pretty closely. The scones came out looking delicious, but I wish they had more of a crumbly texture.

Here's yet another reason we should have taste-o-vision!


Blueberry scones from the King Arthur Flour blog:

2 cups (8 1/2 ounces) King Arthur Unbleached All-Purpose Flour*

1/2 teaspoon salt
1/4 cup (1 3/4 ounces) granulated sugar
1 tablespoon baking powder
6 tablespoons (3 ounces) cold butter, cut into pieces
1 cup (about 5 ounces, about half a pint) fresh blueberries
2 large eggs, beaten
1/4 cup (2 ounces) vanilla yogurt
1 teaspoon vanilla extract
1 tablespoon grated lemon zest (or 1/4 teaspoon lemon oil)
1/2 teaspoon almond extract
2 tablespoons coarse sugar, for sprinkling on top

*Substitute 1 cup King Arthur Organic White Whole Wheat Flour for 1 cup of the all-purpose flour, if desired.

Preheat the oven to 375°F. Lightly grease a baking sheet, or line with parchment.

Whisk the dry ingredients in a bowl. Add the butter and work it into the dry ingredients till the mixture is unevenly crumbly; use your fingers, a pastry blender, or an electric mixer. Gently mix the blueberries with the dry ingredients.

Stir together the eggs, yogurt, vanilla extract, lemon zest or oil, and almond extract. Add to the dry ingredients and stir very gently, just until combined. The dough will be quite moist, like cookie dough.

Use a muffin scoop, jumbo cookie scoop, or 1/4-cup measure to scoop the dough onto the prepared sheet in scant 1/4-cupfuls, leaving about 2" between each. Brush each ball of dough with a bit of milk or cream, and sprinkle with coarse sugar.

Bake the scones for 20 to 24 minutes, or until lightly browned and a cake tester inserted into a scone comes out dry. Remove from the oven, and serve warm. To reheat, wrap loosely in aluminum foil, and bake in a preheated 350°F oven for about 8 to 10 minutes.
Yield: 12 scones.