Wednesday, April 18, 2012

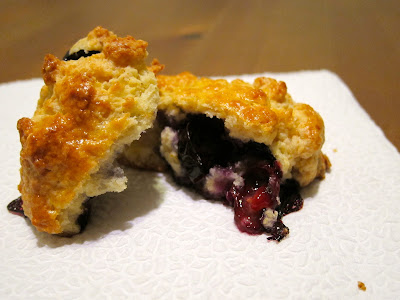
Yogurt and Blueberry Scones

I don't know if I have revealed this on my blog yet, but my all-time favorite fruit is the blueberry. I could eat them all day every day and never get sick of those delicious little morsels.

Perhaps it is odd, then, that I'm not a huge fan of baked goods with blueberries in them. Yes, given the choice between a muffin containing blueberries or any other fruit, I will likely choose the blueberry option, but I still much prefer the fruit so fresh and so clean. I will admit that blueberry baked goods LOOK amazing, though.

That's probably why I was so interested in trying these yogurt and blueberry scones from the King Arthur Flour blog. I had to make a couple tweaks, because I'm out of almond extract and  only had plain yogurt, but other than that, I followed the recipe pretty closely. The scones came out looking delicious, but I wish they had more of a crumbly texture.

Here's yet another reason we should have taste-o-vision!


Blueberry scones from the King Arthur Flour blog:

2 cups (8 1/2 ounces) King Arthur Unbleached All-Purpose Flour*

1/2 teaspoon salt
1/4 cup (1 3/4 ounces) granulated sugar
1 tablespoon baking powder
6 tablespoons (3 ounces) cold butter, cut into pieces
1 cup (about 5 ounces, about half a pint) fresh blueberries
2 large eggs, beaten
1/4 cup (2 ounces) vanilla yogurt
1 teaspoon vanilla extract
1 tablespoon grated lemon zest (or 1/4 teaspoon lemon oil)
1/2 teaspoon almond extract
2 tablespoons coarse sugar, for sprinkling on top

*Substitute 1 cup King Arthur Organic White Whole Wheat Flour for 1 cup of the all-purpose flour, if desired.

Preheat the oven to 375°F. Lightly grease a baking sheet, or line with parchment.

Whisk the dry ingredients in a bowl. Add the butter and work it into the dry ingredients till the mixture is unevenly crumbly; use your fingers, a pastry blender, or an electric mixer. Gently mix the blueberries with the dry ingredients.

Stir together the eggs, yogurt, vanilla extract, lemon zest or oil, and almond extract. Add to the dry ingredients and stir very gently, just until combined. The dough will be quite moist, like cookie dough.

Use a muffin scoop, jumbo cookie scoop, or 1/4-cup measure to scoop the dough onto the prepared sheet in scant 1/4-cupfuls, leaving about 2" between each. Brush each ball of dough with a bit of milk or cream, and sprinkle with coarse sugar.

Bake the scones for 20 to 24 minutes, or until lightly browned and a cake tester inserted into a scone comes out dry. Remove from the oven, and serve warm. To reheat, wrap loosely in aluminum foil, and bake in a preheated 350°F oven for about 8 to 10 minutes.
Yield: 12 scones.

Monday, March 12, 2012

Chocolate-filled shortbread

Last Friday I had an insatiable cookie craving, but I didn't feel like going out to the grocery store or slaving away in the kitchen. I decided to make these chocolate-filled shortbread cookies because they're relatively simple and don't require any special ingredients -- I had everything in my pantry already, including four different kinds of chocolates to stuff inside the cookies.


I can't remember exactly, but I think I came across this recipe via the Kitchn blog, which is a fairly recent addition to my Google Reader. I've been an Apartment Therapy reader ever since I moved to LA and needed ideas to decorate and furnish my apartment, but their AT sister blog focused on cooking and kitchens is truly exceptional. Tons of great recipe ideas and clever kitchen design/appliance ideas. 


The actual recipe comes from Cooking Weekends, and I was intrigued by this recipe for two reasons: first, of course, I love all things chocolate, and second, it calls for corn starch, which I've never included in shortbread before. I adore the way shortbread cookies simultaneously crumble and melt in your mouth, and corn starch is supposed to enhance that characteristic -- winning on all fronts!


Now, back to those four different kinds of chocolates... I decided to play a taste test game (with myself, eek!), using different chocolate bars to figure out which ones work best in the shortbread. The four bars I used were a Trader Joe's 73% organic cacao, an 85% dark from Divine, at 70% dark chocolate orange from Theo, and 70% Madagascar dark from Rogue Chocolates called Sambirano
My favorite for eating is the Theo, but it turns out that the best one for these cookies was the $2 TJ's bar! I think the cocoa butter content in that bar is a little higher than the others, so it melted to a wonderful creamy consistency.
Go figure! Sometimes cost isn't everything, even when it comes to chocolate. Without further adieu, here is the recipe, courtesy of Cooking Weekends:


INGREDIENTS
1/2 cup cornstarch
1/2 cup icing sugar
1/8 tsp fine sea salt
3/4 cup unbleached flour
1/4 cup whole wheat pastry flour
3/4 cup unsalted butter (1 1/2sticks), cut up
2 tsp vanilla extract
4 oz baking chocolate bar, broken into 16 pieces


DIRECTIONS
Place the cornstarch, icing sugar, salt and flour into the bowl of a food processor and pulse a few times to combine.  Add the butter and sprinkle the vanilla extract evenly over the top. Run the motor until a soft dough begins to form.


Preheat oven to 300°F.


Divide the dough into 16 equal pieces. Encase a piece of chocolate inside each piece of dough.


Place the cookies about an inch (or more) apart of an ungreased cookie sheet. Bake for about 25-35  minutes or until the edges begin to brown.


Remove from oven and cool on baking sheet for a minute or two, then remove shortbread onto a wire rack.

Sunday, March 11, 2012

Underwood Family Farms Tour

Remember my last post when I claimed to have a double-header post coming over the weekend? That did not happen. Sorry, but sometimes these things cannot be helped. I have a backlog of posts building up again, and I will try to work through those in the next few weeks, but Finals are coming up, so no guarantees.

Today's post is not actually about baking, but rather an excuse for me to post some fun, colorful pictures from my tour of the Underwood Family Farm in Moorpark, CA. I spent a day on the farm two Fridays ago through a trip organized by my school's Sustainability Club. Perks of this trip included a chance to get out of the city, learning about the farm, and picking my own veggies straight from the field.

After college, I started having much more control over what I ate on a daily basis. Don't get me wrong, I loved the fried delights of Thursday Pub Night and eating my way through Sunday brunch spreads, but those meals weren't doing much for my overall health.  When I came back to California and started working at Google, I started to eat much more healthfully, and also became very interested in the food supply chain. I've found that food tastes better and makes me feel happier when it is fresh, flavorful, and nutritious. 


Enough preaching. Here are some of my favorite pictures from my excursion:


This particular pig is a cool 750 lbs. Can you imagine?!


Finally, here are some pictures of the kale chips and roasted beets that I made from my farm bounty. I actually planned to make/roast these over the weekend and eat them during the week, but they tasted so good I ate everything in one day. At least I don't  have to feel guilty about eating delicious, nutritious vegetables!

Saturday, March 3, 2012

Chocolate glazed chocolate donuts

I have another double-header post coming up this weekend (assuming I don't get bored, distracted or just plain lazy about blogging), so I'll try to keep this one short. (By the way, I have been playing around with the layout of this blog, and made it just a tad wider to accommodate larger pictures. I hope they make you drool just a little bit more!)


One of the reasons I haven't baked (and consequently, blogged) as much this quarter is that my learning team hasn't been meeting as frequently as we did during Fall Quarter. I try not to bake for myself, because then I end up eating the whole batch myself, which isn't very good for me. However, last weekend, my section had a BBQ on Saturday, so I decided it was time to make some donuts... Baked ones, of course.


I found a recipe by searching on Pinterest for the most delicious looking baked chocolate donuts I could find, and eventually settled on a recipe from a blog called The Milkman's Wife


As an aside, have I mentioned that Pinterest is my new favorite way to both discover new recipes and keep track of things I want to try making? I've tried various recipe organization tools over the years, from old-fashioned paper print outs, to Google Docs to Springpad, but none of them really stuck. These other options were either too time consuming, too difficult to organize, or too far outside my daily routine to be efficient or effective. By contrast, I'm really loving Pinterest, because I can browse the Food & Drink section to get new ideas, but I can also pin recipes from across the web (using my handy dandy Google Chrome extension!), all to one board.


Okay, enough geeking out. Let's get baking already!


I'm going to be honest -- these baked donuts are not as dense as real cake donuts (which I love). They're closer to a cupcake in the shape of a donut. But they're still tasty, and they look delectable with a coat of shiny, smooth chocolate glaze. At first, I was disappointed that I didn't have time to get colored sprinkles to make these a bit more festive, but after I started glazing them, I decided that they looked pretty just with the glaze. What do you think?


By the way, this recipe is SUPER fast and easy -- another plus in my book! Here's the recipe, which I found on The Milkman's Wife.


INGREDIENTS
3/4 cup flour 
1/4 cup dutch-process cocoa 
1/2 cup sugar 
1 tablespoon baking powder 
1/4 teaspoon salt 
1 egg 
1/2 cup milk 
1 teaspoon vanilla 
4 tablespoons canola oil 
Colored or chocolate sprinkles (optional) 


1/2 cup semisweet chocolate chips 
2 tablespoons butter 
1 tablespoon corn syrup 
1/4 teaspoon vanilla extract 


DIRECTIONS
Preheat the oven to 450 degrees and coat a donut pan liberally with cooking spray. 
Stir together flour, cocoa powder, sugar, baking powder and salt in a large bowl. Add the egg, vanilla, and milk and stir together for 1 minute. Add the oil and continue to whisk until just combined. 


Transfer the batter to a large measuring cup (or a bowl with a spout) for easy pouring. Fill each cavity in the pan 2/3 of the way full with batter. 


Bake for 7 to 9 minutes or until the donuts spring back when lightly touched. Cool completely before icing. 


While the donuts are baking, prepare the chocolate glaze. Combine the chocolate chips, butter, corn syrup and vanilla extract in a double boiler (or in a stainless steel or glass bowl over some simmering water). Stir until the chocolate is melted and everything is incorporated. Use immediately.


Tuesday, February 21, 2012

Pie for procrastination

Ugh! I'm super behind on both baking and blogging, and unfortunately, I don't think I'm going to be able to whip anything up in my kitchen until at least Friday. Wah! :(  In fact, I should be studying for the midterm I have tomorrow, but I'm so sick of discount factors and yields to maturity that I had to take a break. What better break than to blog about pies gone by?


I joined a food-related social club at school this year, and although the club isn't super active, we do have pretty fun potluck board meetings! For our most recent meeting, I made a lattice top apple pie (swoon!). Why? Well, because...
As you can see, I'm still goofing off with my Wacom tablet as well. 

There wasn't anything terribly unusual about this particular pie... OH WAIT, except the fact that it was both DELICIOUS AND BEAUTIFUL!
I don't have time to type up the recipe, but of course, it was from the Flour cookbook. Speaking of which... According to her Twitter account, Joanne Chang is working on a savory cookbook, which is unbelievably fantastic. If it is everything I'm dreaming, it will be the best thing that happens to my life, and simultaneously the worst thing that happens to my waistline and my grades.

OKAY.

I should get back to studying, but before I do, here is how I made this pie, starting from when I baked the crust... Roll footage!

Okay, okay... Back to studying... Sorry today's post was so spazzy! I've got finance on the mind. :)

Tuesday, February 7, 2012

Super Bowl Sugar Cookies

I don't follow football super closely these days (I'm more of a baseball kind of gal), but it wasn't always that way. In the mid-90s, many a Sunday I could be found jumping around the living room, yelling at the TV, cheering on my beloved San Francisco 49ers. I remember those afternoons vividly because my brother and I had fencing practice at 4:30pm every Sunday, and we always begged Mom and Dad to let us watch one more down before we had to run out of the house. As a kid, I idolized Steve Young and Jerry Rice, I despised the Cowboys, and I thought George Seifert was infallible. Until he became a Panther, that is. This year, for the first time in almost a decade, the Niners made me feel like a kid again. So even though they didn't make it to the Super Bowl, I'm excited to be seeing red and gold again. 

Now then, that's enough nostalgia for a Sunday night...

My classmates had a some people over for the game, and in keeping with the theme, I decided to make football-shaped sugar cookies. I usually avoid sugar cookies because after the first tray, I inevitably grow weary of the "roll, cut, decorate, bake, repeat" routine. Also, the nagging perfectionist in me hates it when the cookies get deformed during the transfer stage between cutting board and cookie sheet. 

But this was special, so I decided to bust out my rolling pin and give it a whirl. I planned to frost the cookies with chocolate icing and use white icing to draw on the laces, but what about cutting the cookies into footballs? I thought about buying a biscuit cutter and pinching the sides to make a football shape, but that would have require advance planning and a trip to the cooking store. Ex-nay. Then I considered cutting a football-shaped template and using it as a guide, but I couldn't be bothered to find an appropriately clean piece of cardboard. Ex-nay. So... what's left? Free-hand, of course! A little knife work is good for keeping nimble fingers, I say.


Here is a drawn recap of how I cut all those footballs, courtesy of my brand new Wacom Bamboo tablet! First, I cut circles of dough using a coffee mug, then I lightly scored each circle with a cross. I used the score lines as a guide to cut symmetrical shapes (well, almost symmetrical), then I loaded up the baking sheet and popped those suckers in the oven!

After the cookies cooled, I frosted them with chocolate icing, then drew on the laces using white icing. If I had to do these cookies again, I think I would have rolled the dough a little bit thicker and baked them a little bit less, because I like my sugar cookies a little but soft, but to be perfectly honest, these were more about the looks. So how *did* they look? See for yourself! Here are the results, in full HD!


And here's the cookie recipe, courtesy of the Flour Bakery Cookbook, as well as an icing recipe that I made up:

Ingredients


1 cup (2 sticks) unsalted butter, at room temperature
1 1/2 cups granulated sugar
2 eggs
1 tablespoon vanilla extract
3 cups unbleached all-purpose flour
2 1/2 teaspoons baking powder
1/2 teaspoon kosher salt


1 cup confectioners sugar
3 tablespoons milk
1 teaspoon vanilla extract
1/4 cup chocolate chips


Directions


Cream together the butter and granulated sugar for about 5 minutes using a stand mixer (or 10 minutes by hand with a spoon, like me!). Beat in the eggs and vanilla.


In a medium bowl, stir together the flour, baking powder and salt until well mixed. Slowly blend the flour mixture into the butter-sugar mixture and then mix just until the flour mixture is totally incorporated and the dough is evenly mied.


Scrape the dough onto a sheet of plastic wrap and wrap the dough in the plastic wrap, pressing down to form a disk about 8-inches in diameter and 1-inch thick. Refrigerate dough for about 1 hour, or until it firms up enough to roll out (I did mine overnight and it warm up on the counter before rolling out).


Preheat oven to 350 degress.


Roll out your dough, cut out your shapes, and place them on a cookie sheet. Bake for 12 minutes, or until the edges turn brown but the centers are still pale. Let the cookies cool for 30 minutes on the baking sheet, then transfer to a wire rack.


While the cookies are cooling, mix together confectioners sugar and milk. Remove 1/4 of the icing and set aside.  Melt the chocolate chips, and mix into the larger portion of the icing. Using a pastry bag filled with the chocolate icing, draw the outline of a football on each cookie, then fill in with more chocolate icing. Once the chocolate icing hardens, draw on the football laces using the remaining white icing.